
As an avid RV enthusiast, I’ve come to appreciate the intricacies of every component that makes my road trips comfortable and enjoyable. Among these, the RV water heater often goes unnoticed, that is, until a chilly morning reminds us of its crucial role.
In this article, I’ll discuss the workings of RV water heaters, offering insights and tips to ensure their optimal functioning.
From understanding the basics to mastering maintenance, let’s explore how to prevent these vital systems from turning into unexpected emergencies.
RV Water Heater Basics
One of the most important systems on your RV is the water system. It includes freshwater (municipal and stored) and wastewater (“gray” sink and “black” toilet water).
Part of the freshwater system is the water heater that produces and stores hot water for delivery by the water pipes and fixtures. Most hot water heaters are fueled by propane or electrical systems.
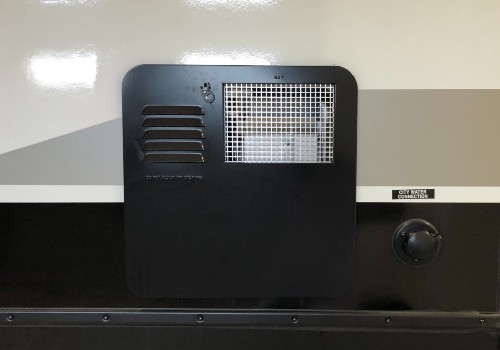
Most RV water heaters are installed on the driver’s side of the trailer or motorhome, often near the center or rear. They include a square metal cover with vents to dissipate heat.
Most hot water heaters have a clip near the top to allow easy removal of the cover. Some older propane units require that the pilot light be manually lit, while others have an automatic igniter.
Check your RV owner’s manual (or ask an RV technician) for instructions on how to operate the water heater.

- Optimum Performance — The RV water heater needs to be connected to 12-volt DC power and propane. Inlet and outlet water…
- All RV Water Heaters can be Replaced — The Fogatti RV water heater has a wide range of applications. The opening is 13 x 13…
- Incessant Hot Water — More efficient and reliable than traditional tank water heaters. It does not require you to waste 20-30…
- Unprecedented Experience — The high altitude suitability mode allows the machine to run smoothly even when driving the caravan…
- Staged Combustion Technology — There is a microcomputer inside the control device, which controls the amount of flame in summer…
RV Water Heater Maintenance
Once the pilot light is lit or the electrical element is powered and the thermostat turns on, heat is generated within the water heater holding tank. The tank itself typically is 6 to 20 gallons (23 to 76 liters) in size.
If no hot water comes out:
- Open the hot water faucet(s) to bleed air out of the system.
- Make sure the 12-volt water pump is on if the system isn’t hooked up to pressurized municipal water.
- Check the hot water heater valves (on the interior side of the tank, typically accessed under a bed or cabinet) to make sure the water can flow into and out of the tank. (Many owners adjust these valves to drain water from the tank for winter storage.)
Anode Rod Replacement
The most forgotten RV water heater maintenance job is to replace the tank anode rod (see photo) periodically. A good time to replace it is when you winterize your RV and drain water from all onboard tanks, including the hot water tank.
The anode rod is simply a cylinder of magnesium that dissipates in “hard” (high mineral content) water. In the photo, the top rod is brand new and the bottom rod is nearly used up.
Want to Connect With a Community of Over 1,078 RV Enthusiasts?
No products found.
This process can take one to ten years, depending on how much you use your RV and the hardness of the water you use. Aluminum anode rods are used in areas of extremely hard water.
To replace an anode rod:
- Turn off the power to the water pump.
- Turn off the propane supply and electrical power to the water heater.
- Make sure the hot water heater is cool.
- Use a socket wrench (typically 1-1/16″) to rotate the plug head counter-clockwise to remove it. If difficult to move, apply WD-40 or rust remover to the threads and let it soak in before trying again.
- Remove and inspect the old anode rod. (Water will drain from the tank as you remove the rod.) Replace the rod with a new unit (typically under $20) if more than 75% of the rod has been sacrificed. (Tip: Wrap the threads with white PTFE “plumber’s” tape for a better seal.)
- Remember to fill the water tank and turn on the power supply before using the hot water heater.
That’s it!
Now you know more about hot water heaters than 90% of all RV owners.
The tip on checking and replacing the anode rod, especially, can save you hundreds of dollars by extending the life of your RV hot water heater and minimizing camping emergencies.
How to Maintain an RV Water Heater (Video)


"Man cannot discover new oceans unless he has the courage to lose sight of the shore."
-- Andre Gide


