
Many RVers, especially full-timers, find the refrigerator and freezer that comes with their camper lacks in space and cooling effectiveness.
Luckily, you don’t have to learn to live with this frustrating issue. The best way to improve your RV’s function is to swap out the standard RV fridge for a residential version that’s not only larger but cools more evenly.
To help you see if this type of camper conversion is right for you, I explain the difference between how RV and residential refrigerators operate and the steps on how to switch out an RV fridge for a residential version.
I can claim from my own hands-on experience that this DIY project isn’t as daunting as it sounds and makes camping much more enjoyable, so check out the details below!
RV Refrigerator vs. Residential Refrigerator – Which Is Best?
To understand why RV fridges perform differently than a residential fridge, you have to look at their type and how they operate.
Depending on your camping needs and RV house battery setup, one fridge type may be better than the other.
That’s why I also highlight the pros and cons of each type so you can make an informed choice.
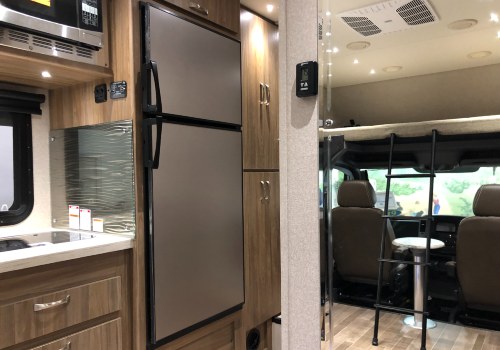
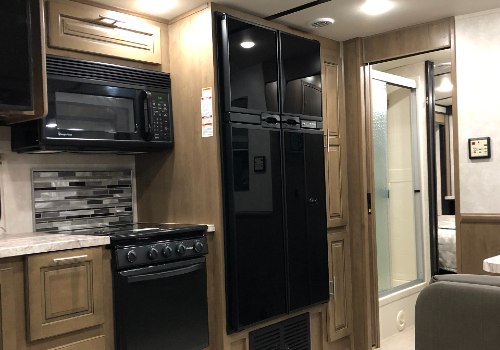
Absorption Type RV Refrigerators
RV-specific models are absorption refrigerators, which means they have three ways to power the unit:
- LP (propane) gas
- 110-volt electricity
- 12-volt battery power
The fridge relies on a gas-flow heat exchange system on the rear of the unit to pull heat from the interior, so it stays cool.
The cooling system and propane gas piping take up a good portion of the depth of the refrigerator, so the internal space to store food is smaller than it appears from the outside.
To avoid pooling of fluid in the cooling system coils, an RV fridge must remain close to level at all times to prevent damage. Other cons of RV fridges include:
- Uneven and weak cooling
- 12-volt power necessary to run power panel
- No self-defrosting feature
- Must pay for propane when not on shore power
- Expensive to replace
The benefits of RV-specific refrigerators are:
- Already built-in so it matches decor
- Runs quietly
- Allows you to run fridge during travel
- You can use propane and 12-volt for off-grid camping
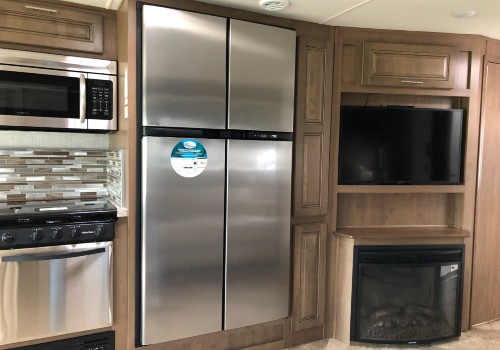
Compressor Type Residential Refrigerators
Residential fridges run off 110-volt electricity only and are compressor-type refrigerators. The units are very energy efficient.
The cooling action comes from a small compressor unit that works with a long coil to move refrigerant along the line to cool air inside the fridge and dissipate the collected heat outside the unit.
Because the compressor is so compact, the fridge’s interior space is much larger than a similar size RV fridge.
Other pros of installing a residential fridge include:
- Do not require RV to be level to operate
- Can use free campground power to run the unit
- Cools to lower temps with precision
- Remains at a consistent temp regardless of ambient temperature
- Freezer is much colder (no more mushy ice cream)
- Run effectively off 12-volt RV battery and inverter systems
- Affordable to install and replace
Cons of putting a residential fridge in your RV:
- Fridge can’t run when not on shore power
- Can’t operate fridge while traveling
- Requires more finish/trim work to make fridge fit in seamlessly
- May require a boost to solar panels, inverter strength, and battery bank to operate off-grid
- Don’t come with secure door latches
Why I Changed My Motorhome Fridge to a Residential Unit
The majority of RVers don’t give much thought to their camper’s fridge until it breaks. That’s what led me down the eye-opening path to my own DIY switch from RV to residential fridge.
I was four years into my full-time RV life, and when the fridge went kaput, I thought, “No biggie, I’ll just order up another and put it in!”
Well, the joke was on me, as a replacement Dometic absorption fridge was $1,600 and way out of my budget.
As I already went propane-free in my motorhome, I was only operating the fridge on shore power as it was, so the idea to go with a residential unit wasn’t much of a stretch.
At this point, I had also become friends with plenty of other RVers who made the swap to a residential fridge, and all of them are very happy.
As I began pricing household units that would fit into the current fridge’s space, I was happy to see that I could easily buy one for around $300-$400, and it was small enough to transport in a friend’s SUV to my campsite.
Long story short, I took apart my RV fridge, got it out of its cabinet, out the camper door, and to the dump. It wasn’t as easy as I anticipated as it was the exact width of my RV door, but I managed.
The new fridge popped in quickly. I only had to add in some bracing, put Museum Putty under the feet, plug it in, add in a bit of finish trim, and paint it to match.
It was a joy to finally have an efficiently cooling RV fridge with so much more interior space than the old model. The food and drinks were much colder even when set at the same temperature as before, and items in the freezer were solid, not soft.
How do you keep food cold during travel days, you may ask?
The answer is to keep the door shut. I had to put on a latch to secure the door while driving, but if I kept the door shut, I could go 14-15 hours without worrying food would spoil.
That length of time is plenty for me to reach my new destination. I use up all my fridge food before I unplug the RV or put things into a cooler with ice if I know I’ll be boondocking for several days.
Now let’s take a look at the steps to replace an RV refrigerator with a residential unit.
How to Switch Out an RV Fridge for a Residential Version

Not every RV fridge will be the same, but most will require the following steps for safe removal of the old unit and installation of a new residential fridge.
Step 1. Measure for New Fridge
Before you pull out the current RV fridge, take height, depth, and width measurements of the compartment it sits in, so you can purchase a residential unit to fit the space.
You want the new fridge to fit well, but it’s best to allow 2-3 inches of airflow along all sides and the top to help dissipate heat from the compressor and tubing.
You also need to measure the width of your RV door to ensure the new fridge (with or without the doors attached) will fit through the opening.
Step 2. Cap off Propane Line
Before you remove the old fridge, you’ll need to unplug the unit, disconnect the 12-volt battery power, and cap off the propane line.
To cap the line, you need first to shut the main propane valve. Some RVs will have a valve shut-off at the back of the fridge in addition to the main valve, so close that if you have it.
Keep the valve shut and cap the line by using the appropriate fitting for either straight or flared ends. If you’re unsure, take photos of the end of your propane line and bring it with you to the hardware store.
You need to ensure a tight seal, as you don’t want propane leaking into your camper once you turn the gas back on to run your water heater or stove.
Step 3. Remove Old RV Fridge
You will pull the old fridge out from the front of the cabinet and bring it out your door.
You may need to carefully remove some trim work around the fridge opening or cabinet to gain full access to the refrigerator’s legs and sides.
Many RV fridges are elevated for ease of use. Mine was on a platform above my furnace.
You’ll need to pull the unit forward and lower it carefully to the floor, so have another person to help. Some fridges may be bolted from below to prevent movement, so if it doesn’t budge, find the bolts and remove them.
Once the unit is free of the cabinet, remove the doors by unscrewing the hinges or brackets at the top and bottom. Remove the hinge if it sticks out, as it’s going to be a tight squeeze getting the frame out the door.
Step 4. Install New Residential Fridge
Want to Connect With a Community of Over 1,078 RV Enthusiasts?
Bring your new residential fridge into your camper.
Before you put the fridge in place, wipe or vacuum out the compartment and take a peek at the upper and rear vents to make sure they are free of leaves or other debris that could prevent air circulation.
Put the new fridge into place within the opening. Adjust it so the door opens and shuts properly, without hitting the cabinet sidewalls, before securing it down.
Once you have the fridge in place, level it up by turning the adjustable legs, and plug in the unit. You should be able to use the existing outlet from the old fridge and reach it from the exterior of the RV through the RV fridge access door panel.
You can now reattach your 12-volt battery bank connections and open up your propane valve.
Step 5. Secure Fridge Against Travel Vibrations
You don’t want your new residential RV refrigerator to tip, slide, or bang around while driving, so you need to secure it.
If there are brackets to bolt it to the floor, use them. You can also add one or two L-brackets that span from the fridge to the side of the cabinet wall.
Some people force a pool noodle in a vertical position along both sides and across the top to buffer the fridge from the movement if the gap is small enough.
Using a bit of Museum Putty or a dab of adhesive caulk under the feet is another cheap and easy way to stop the legs from sliding.
Step 6. Finish Trimming Out Fridge Opening
Reattach any trim you removed from around the fridge opening or add new trim to fill any wide gaps that look unattractive.
Paint or stain to match existing decor, and you’re all done.
You may want to purchase and install a fridge door lock or latch to keep the doors from popping open during travel.
Step 7. Upgrade Any RV Power if Necessary
Most RV fridges will already have a dedicated breaker and fuse in place that will continue to work for the new unit. In rare instances, you may need to upgrade this feature to suit your residential fridge amperage.
If you’re using an inverter with a battery bank (when not plugged into shore power), make sure it’s a pure sine wave inverter that won’t damage delicate appliance electronics like your new fridges power panel.
If you plan to camp off-grid for long stretches, you may need to add another battery or two and add solar panels to your system if you want to power your new fridge fully.
Once the initial batteries drain, you won’t have the motorhome or tow-vehicle engine to charge them back up if you aren’t driving, so additional charging options via solar or running a gas generator are smart.
Final Thoughts
A residential refrigerator in an RV provides more food-storage space and better temperature control. These convenient features are why more and more recreational vehicle manufacturers are adding residential-style fridges as a standard or optional feature on newer RV models.
If you aren’t ready to buy a new RV anytime soon, don’t let that stop you from enjoying the benefits of a larger, more efficient residential refrigerator in your travel trailer, motorcoach, or fifth wheel.
Follow the steps above and switch out that bulky and expensive RV absorption fridge for a low-cost, sleek, and energy-efficient electric-only model.
The best part is that a residential fridge makes any RV feel more like home!
How to Replace RV Refrigerator with Residential Fridge (Video)


"Man cannot discover new oceans unless he has the courage to lose sight of the shore."
-- Andre Gide


")

How do you switch a Residential fridge to a RV fridge!! Everything out there goes the other way and I would like to get rid of the Residential fridge.