
RVing is a fantastic way to travel, but let’s face it: most RV interiors are ugly and have poor design.
Why live with that uncomfortable dinette table or ugly cabinet color?
I am here to help you navigate easy RV modifications that can transform the look and comfort level inside your camper.
With some planning and know-how, you can make your camper suit your needs perfectly so all your RVing adventures run more smoothly.
3 Reasons People Are Afraid to Modify Their RV
Skill Level – People with little or no carpentry skills feel RV modifications are too difficult to tackle.
The reality is that many renovations require only a couple of basic tools, some elbow grease, and very little technical knowledge.
Cost – Many people don’t think it’s worth the extra cost to alter the existing layout.
In reality, many of the most common modifications will cost $100 or less but deliver much more convenience and comfort, which is priceless.
Resale Value – I hear all the time from fellow campers who are too scared to make changes because they think it will affect resale value.
The reality is that unless you botch the job, the RV value will not decrease. If you find your RV more comfortable after a modification, so will any future buyer who will appreciate you completing the work for them.
Understanding RV Build Basics
Before you take on any RV modifications, understand they do not build campers like a home. The materials are always thinner and frankly lower quality, no matter how “nice” they try to trick you with the surface finishes.
When you know what to expect upfront, you are less likely to be frustrated, caught off-guard, or without the right tool to complete the job.
Studs are often 2 1/2 inches wide instead of 3 1/2, and the wallboard is a thin composite that I’m sure is nothing more than dense cardboard.
Carpet is cheap and useless in an RV as it gets dirty fast, and you now have to drag around a bulky vacuum. Be ready if you want to replace it with an easy-to-clean wood or vinyl floor because the manufacturer will get the last laugh.
What do I mean? Well, while you may find only two screws holding up that massive cabinet, you will find 1,238,530 staples holding down an 8′ x 10′ piece of carpet.
Just be ready with patience and a flathead screwdriver to pull them all out. Trust me; a carpet-free RV is worth the effort!
Speaking of screws, get ready to renovate by buying every screw bit imaginable because RV builds include screw head designs that are flat, Phillips, square, and star in varying sizes. Often, you find several types when trying to remove a single cabinet!
On the bright side, RV plumbing is outstanding if changes are necessary. Most use PEX plumbing lines that are both flexible and tolerant of extreme temperature fluctuations.
Spend a few extra bucks on Sharkbite fittings for the PEX, as it saves so much hassle if you choose to upgrade your bathroom vanity, toilet, or fixtures. Remember that any plumbing work will be in tight quarters, so easy push-to-fit connections are a life (and back) saver.
4 Easy RV Modifications
Here are the four most common, low-cost, and simple ways to modify your RV to improve comfort and function and give your space a style upgrade.
1. Dinette Removal
Why:
The booth dinettes found in most RVs may look nice but are not very functional and take up a lot of floor space. Swapping it out for a traditional table and chair set gives everyone more room to move about and adjust the seats to their liking.
In reality, most RVers eat their meals on the couch since it’s more comfortable and opts to use the dinette space for something more practical, such as an entertainment center or lower cabinets with a counter on top for more kitchen workspace.
Unless you will be using the dinette table that lowers into a bed regularly for that purpose, changing it out makes much more sense.
How To:
Get your screwdriver ready and start by removing the table. You can unscrew the top from the bracing or legs or unscrew it directly from the floor.
Some tables are bolted to the floor and will require a ratchet-style wrench to get them loose.
Next, remove any cushions, doors, or drawers from your booth benches.
Many seats lift to give you access to storage underneath, and if so, unscrew any hinges holding the lid in place. Others have a solid top that you can unscrew from underneath by reaching inside through any door or drawer openings.
Lastly, remove the screws around the bottom framing’s perimeter, and the box of the booth should come right out.
In most instances, RV flooring goes down across the whole floor before they install any furniture. This practice means there should not be a need to patch up flooring aside from filling any screw holes with some matching caulk.
When removing the booth, consider putting up the set for sale on a local marketplace, as many people are renovating campers and are looking for deals.
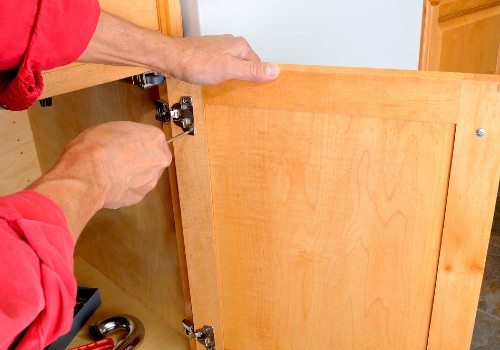
2. Removing Cabinets
Why:
Upper cabinet removal is a project I highly recommend to every RV owner, especially those in a bedroom above or next to the bed that hangs in the way, so you’re always banging your head.
In the main living area, removing the upper cabinets really opens up space, making the whole RV feel much larger.
If your kitchen has a bend that juts out and there is a cabinet above it, removing it clears the line of vision and increases the ease of using the countertop to its full potential.
If you need the storage, leave the cabinets over the couch or seating where they aren’t in the way of traffic patterns.
How To:
Begin by removing the doors and hinges. Next, remove interior shelves if they aren’t attached.
After that, from the inside, slowly lift the bottom panel of the cabinet. The panel is stapled in place along the outer edges, so use a flathead screwdriver to pry under the edge and pop up the panel.
Use a flashlight to see if any wires are running through the bottom underneath the panel. If you see wires (usually running to undercabinet lighting), turn off the breaker and detach the wires going to the fixture.
If not, you can unscrew the cabinet from the wall by locating the screw attachments along the back framing. The cabinet should come off in one piece.
Once the cabinets are down, use spackle to fill in any screw holes and some craft paint to fill in to match your walls.
Either cut back and safely seal off any wiring, tuck it away behind a picture, or consider adding a sconce-style light to the wall instead.
3. Adding Shelving
Why:
RV cabinet shelving is odd. They either rarely have any shelves at all, while kitchen cabinets only offer one or two ill-placed ones.
I think every RV has a thin, tall cabinet, which I believe is to hold brooms and mops or other long-handled or tall items that don’t fit elsewhere. In reality, cabinets in the RV can function better if you redesign the interior shelves.
How To:
Buy 3/4-inch-thick wood boards that are the width of your cabinet. Most come in six or eight-foot lengths so that you can cut several out of one piece.
Do not buy pressboard or MDF, as these materials do poorly in campers due to extreme weather fluctuations and humidity.
Also, pick up metal L-brackets or 1/2-inch by 2-inch wood trim to cut and screw in for bracing under your new shelves.
Look at your cabinet space and how you actually use it. Tailor your shelving to fit your needs exactly. Once you cut shelves and install the bracing, you can paint them to match your decor before installation.
Have an Insta-Pot? Create a cabinet shelf at the perfect height so it fits snugly in its space. Doing so not only keeps things from moving as much during travel but also encourages you to put things back in their space, which keeps things tidy.
Ideas:
My solution to creating a kitchen “pantry” was to modify that odd, tall, and thin cabinet.
I bought open-top bins that fit sideways into the cabinet width and then built shelves just a bit taller than the bin’s height.
Want to Connect With a Community of Over 1,078 RV Enthusiasts?
I built the shelves three inches shorter than the cabinet depth (front to back). Now, I have six custom shelves with bins that hold tons of canned and dry goods.
By creating a tighter fit with the bins and the shelves, I can slide the bins nearly all the way out, and they tip down a bit but don’t fall, so I can quickly access what I need. The containers don’t budge during travel, either.
I still have several inches of clearance in the front to hang my broom or other tall items, making this once unuseful space super functional.
Another great use of a small space is to install desktop cube shelves, either as a single or in groups. Once you insert the 6″ fabric drawers, you have instant storage that looks neat and keeps your small stuff organized.
I stacked four of these units sideways and screwed them together and to the floor in a row under my large side RV window that once had a captain’s chair bolted to the floor. I added a few L-brackets to hold it securely to the wall.
The whole “wall” of 24 cubes only infringes into the room six inches but holds socks, underwear, tank tops, swimsuits, sleepwear, charging cords, pet leashes, and so much more. The old space was just a useless bare wall.
These smaller cube shelves are so easy to tuck just about anywhere in the RV, and the fabric drawers come in a wide array of colors to suit any aesthetic.
To combat drawers falling out during travel, I glued one-inch strips of velcro to the drawer’s back and the coinciding back wall. Enough grab to keep them in place, but not so much to make them hard to pull out.
4. Painting or Covering Walls and Cabinets
Why:
To exchange generic or ugly wall and cabinet tones for something much cozier and suited to your taste.
RVs across all types of campers and price points get their furniture and decor from a few suppliers. To appease most buyers’ tastes, all shades of tan and cream abound, with wood tones or accents adapted to the latest trends.
A quick update to personalize the camper and make it less boring is to paint the walls or cabinets. For just a few dollars, the transformation can be dramatic, making your RV interior brighter and more cheerful.
How To:
To make sure your paint job lasts, always clean any dirt or grease off wall or cabinet surfaces before painting and allow to dry.
For walls, pick a primer that will stick to the surface of your wallboard, which in most RVs typically has a thin vinyl veneer. If you don’t choose a primer or paint-and-primer combo meant for plastic or vinyl coverage, the paint will start to bubble and peel, ruining all your work.
Primer well and let dry, then add two coats of topcoat with dry time in between. I suggest using a four-inch roller for painting the walls as it fits nicely into all the smaller spaces and allows you to paint in the trim work over the seams easily.
For cabinets, remove the doors and tape off or remove the hinges. Quickly run over all the wood surfaces with medium-grit sandpaper to knock down any high sheen, and wipe the dust off using a tack cloth.
Too much sanding is tedious, so I suggest buying a quality primer made to go over laminate or varnished surfaces. Foam roll or paint on the primer and allow it to dry for 24 hours.
Next, roll or brush on your topcoat in any color you desire. Remember, this is for your RV, so feel free to be a bit adventurous!
When the topcoat is dry, go over the surface with fine-grit sandpaper to remove any bumps or flaws, and clean off with a tack cloth.
Add one more coat of paint until all areas have full coverage and look complete. For extra protection, you can roll a layer of polyurethane over the paint.
Allow to dry for 24 hours, then reattach the doors and hinges and enjoy your beautiful new cabinetry!
Make Your RV a Home Away From Home
When you own an RV, there is no reason to put up with a lousy design, ugly furniture or fixtures, or hideous wallpaper. Make the space your own by making it work for your needs.
Don’t be afraid to take on one of the easy DIY RV modifications above. If it goes well, you’ll have the confidence to find other ways to make your RV more functional, like changing the flooring or faucets.
When you add personal touches to your RV, your camper becomes instantly more cozy and comfortable for everyone!
Easy RV Modifications and Upgrades / DIY Mods (Video)


"Man cannot discover new oceans unless he has the courage to lose sight of the shore."
-- Andre Gide


")
