
RVs can always use more easily accessible storage space, which is why the poorly designed RV dining booth is a top feature to customize.
Dinette booths have deep and wide seating, which means the compartments underneath the seats are also spacious. Unfortunately, to reach the interior of most dining booth seats, you must have everyone exit the table, remove the cushions, and lift the lids.
Many RVers rarely use their dinette as the comfort level is lacking, and they can use the space for better purposes.
The truth is that the common design of most RV dinette booths isn’t user-friendly, so stay right here to learn the best ways to increase the functionality to make the most of every inch!
9 RV Dinette Booth Customization Ideas
1. Swap the Booth Seating for Chairs
The top alteration of RV dining booths is to remove the benches and use chairs instead. Most full-time RVers make this transition within the first year or two on the road.
The reasoning behind this move is that the stationary benches don’t allow people to adjust the seat location to fit their needs and size better. Many people find the benches too far back or too low or high in relation to the tabletop for comfort.
By removing the bench seats, you will be losing storage space, but most find having comfortable chairs that are easy to move an excellent trade-off. Eating meals, playing games, or working is much easier for all when you have individual chairs.
The benches typically have screws on the inside bottom framing that secure the bench to the floor and a few along the side or back walls. Remove the screws, and the whole bench should come free.
Most RV builds are from the outside in. For example, the walls and all the finished flooring are in place before installing the furniture and appliances.
Most of the time, you’ll only have to fill and disguise the screw holes in the floor and walls to finish the transition.
Would you please not toss the benches? Think about possibly repurposing them elsewhere in your camper or home or donating them.
Another option is to post them for sale on a local social media marketplace and make some cash to offset the cost of your booth renovation.
2. Create an RV Office

For remote workers or homeschooling, using the dinette booth area for a well-appointed office is a great way to create a much more functional RV.
Most RVers end up eating meals sitting on the couch, using a tray table, or outside in camp chairs anyway, so losing the large tabletop isn’t a concern.
You can remove the table and benches entirely and install a desk with drawers facing outward to see the views or against one of the solid walls, depending on the width of your desk.
If you have kids who need to complete schoolwork, you can add two inexpensive desks with chairs where the benches were.
Some people leave one or both of the benches in place but install a desk or wide shelf above and between them to create a desk surface. Removing the cushions and painting or staining the wood benchtops provides a flat surface to hold files or office supplies.
If a desk or shelf gets in the way of top-opening bench compartments, you only need to cut the panel and add another hinge at a point where it can move freely, allowing access to the storage underneath.
Keep reading for additional ways you can convert dinette benches for office or general RV supply needs.
3. Install Doors or Drawers
Adding access doors or drawers to the base of dinette booth benches in an RV is much more convenient than needing to remove occupants and cushions before lifting the lid to access the storage space.
You can easily add doors or drawers by measuring the spaces between the framing on the inside of the bench and getting sizes to fit.
DIY or hire a handyman to cut openings, and make or buy door panels that swing open for much easier access.
Having a door at the end of the bench that opens into the main living space is better, as it allows you to load long or bulky items inside.
The end cap is also ideal for drawer installation, so you can open it fully and not have to hunch under the table to see what’s inside. This location is especially helpful for filing-cabinet style drawers.
You can DIY custom-size drawer units or buy premade drawers and hardware for the tracks to make the conversion easier.
4. Create a Hobby Center
RVers love to craft or work on hobbies while traveling but storing supplies in a convenient location is a challenge. Needing to pull out boxes from exterior storage compartments or the bedroom closet can turn a fun hobby into a chore.
Instead, rethink how you use the dinette booth features to suit your needs better. For example, if you love to craft and appreciate the large tabletop, leave it be, but altering the benches into efficient supply storage is smart.
Pull off the front panels of the benches and install inexpensive stackable drawer units that fit the space. This customization gives you lots of drawers to separate supplies that you can label for quick grab-and-go.
There is a wide selection of stackable drawer unit sizes and colors to choose from, so you can customize it to fit your supplies. You can also find wooden options if you want to upgrade the look.
The best part about using portable drawer units is that you can easily remove them, pop the front bench panel back on, and return your RV to its original condition.
For music lovers, removing the table and one bench gives you room to set up a music stand and sit and play the guitar, sax, violin, keyboard, or other instruments. In addition, you can add some hanging file organizers to hold sheet music and add brackets to display and store your instruments.
Another excellent option for larger instruments is to open up the front of one bench and install a shelf and padding. This arrangement allows you to lay down the instrument and keep it safely out of the way during travel days, but it is still easy to access when you want to play.
5. Add a Cat Litter Box or Kennel Station
Adding an access hole to the dinette base and placing a cat litter box inside the bench is a wonderful way to keep it out of the way and give your cat the privacy it craves when nature calls.
If you have a motorhome and are tired of having to lug around a crate for your small pets, you can use the underside of one bench as a permanent kennel station.
If you remove a portion of the front panel and add a locking door with a metal grate (repurpose one from an old kennel or crate), you only need to add some padding and food bowls to make a cozy home away from home for your pets.
When you’re not traveling, you can leave the door open so your cat or small dog has a place to hide out and relax away from foot traffic.
6. Reconfigure the Seating
U-shaped dinette booths are much more functional than standard slide-in two-bench versions and give occupants more room to spread out for games or meals.
Remove the table and add framing to support a bench that stretches along the back wall between the original booth seating. Add some cushions, and viola, you have one or more extra seats!
You can move the table bracket outward to leave room for people on the new seating if it doesn’t infringe too much into the main RV living space, or cut down the table on that side to create room. You can also replace the tabletop with a smaller size so everyone fits comfortably.
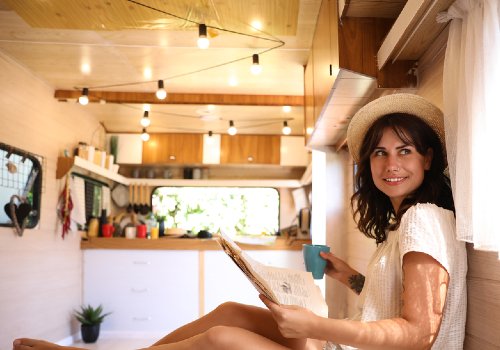
7. Create a Reading Nook and Library
The window above most RV dinette booths is typically large and brings in tons of natural light, ideal for reading.
If you’re a book lover, you may find having an RV library much more to your liking versus a rarely-used dinette set.
Remove the table and benches and replace them with a comfy chair with an ottoman or a recliner and a small side table. Measure the remaining space so you can line it with the bookshelves you purchase or DIY to hold your favorite tomes.
If you add a dowel or wood trim across the front about two inches above the bottom of each shelf, books won’t slide out during travel days.
I also find that most bookshelves are deeper than you need, so find slimmer options to increase interior space so your camper feels less cramped.
8. Update Cushions and Tabletop
Can we all agree that RV dinette booth fabrics and tabletops are either boring, cheap-looking or possibly even ugly? Cushions also tend to lose their spring quickly, leaving you uncomfortable before long.
Want to Connect With a Community of Over 1,078 RV Enthusiasts?
The good news is that you can customize an RV dinette booth quickly and least expensively by reupholstering and beefing up the cushions. Swapping out or refinishing the tabletop is another way to let your personality shine in your camper.
If your dinette cushions are loose, you can use the old covers to DIY or hire someone to sew new versions with a fabric in a color and pattern you love.
If the cushions are too thin, you can buy another inch or two of padding to increase comfort. To cut costs, consider purchasing a mattress topper (either standard foam or memory foam), as the material is much cheaper versus the padding sold in fabric stores.
A twin size is often large enough to cover your needs and costs less than $50, but you can always go with a full or queen if necessary.
Adding piping or trims to the new cushions in contrasting or complementary colors adds to the custom look and is worth the extra bit of effort or cost.
Another great tip is to select a durable outdoor or heavy-duty upholstery fabric when picking out the material. RV booth seating can get a lot of use, and it is often one of the first places that will tear, fade, or wear down since people slide across the surface to enter.
A quality fabric will ensure long-lasting results in both function and looks. Spray the cushions with a stain-repellent before using them to aid in quick spot cleaning.
I do suggest you avoid any faux leather or vinyl material for the booth. While the material may seem easier to wipe down and keep clean, it isn’t the most comfortable as it causes sweating, especially if you’re wearing shorts.
Another downfall of this type of material is that it’s difficult to hide or fix once the surface gets scratched.
Many fabrics of this type also look great for a year or so. Then, the surface starts to flake or peel off, leaving you with a mess.
As for the tabletop, you can customize it by refinishing it with paint or a different shade of stain. In addition, you can swap out the top for a thicker or better quality solid-wood selection or reshape it using a saw to fit better in the space.
If you’re crafty, consider trying your hand at countertop resurfacing kits that help you achieve finishes like faux marble or granite. You can also paint a custom pattern or cover the table with stickers from places you’ve been and seal it with a two-part resin epoxy for a fun look.
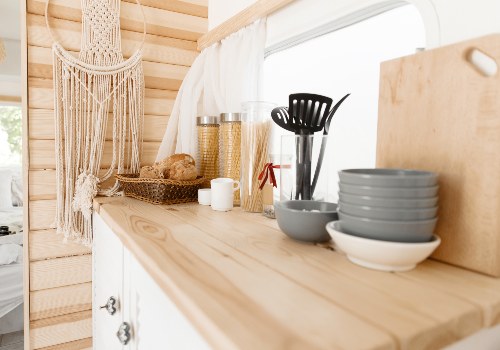
9. Expand the Kitchen
Are you a lover of both camping and cooking? Are you super frustrated by the lack of counter space in your RV kitchen?
If so, this dinette booth customization is for you!
After you remove the benches and table, line the lower section of the walls with cabinets and add a full counter on top.
The U-shape provides a ton of extra countertop for food prep, layout supplies, cool down racks of freshly baked cookies, and allows you to have additional cabinet space for storage.
If you add in stools and cabinets with pull-out cutting boards, you can then use these as individual dining tables and extra surface area for food prep or serving.
You could also extend a portion of the countertop into the living space to create a small eating table.
Final Thoughts
Modern RV dinette booths are getting more functional as manufacturers listen to customer complaints about comfort, size, and storage access, but that doesn’t help those stuck with versions that do nothing to improve their camping experience.
When you rethink your frustrating RV dinette by considering any of the options above, you can transform the space into a more functional version that suits your needs perfectly.
I hope this guide inspires you to make changes to your camper’s booth dinette to make it more user-friendly or create a whole new space that makes RV life more enjoyable!
We Removed Our RV Dinette Booth (Video)


"Man cannot discover new oceans unless he has the courage to lose sight of the shore."
-- Andre Gide


Really helpful info, thanks!