
Knowing how an RV toilet works is essential for new RVers and current owners who may want to fix or replace their units.
You may wonder if an RV toilet is really different from a residential toilet, and the answer is yes.
To help you learn everything on the topic of recreational vehicle toilets, I detail:
- How an RV toilet works
- Steps to use an RV toilet properly
- Alternative RV toilet options
- Helpful RV toilet tips
- Answers to FAQs about camper toilets
Don’t make mistakes that lead to a stinky camper or an annoying repair. Read up on all you need to know about RV toilets right here so you’re ready for camping season!
How Does an RV Toilet Work
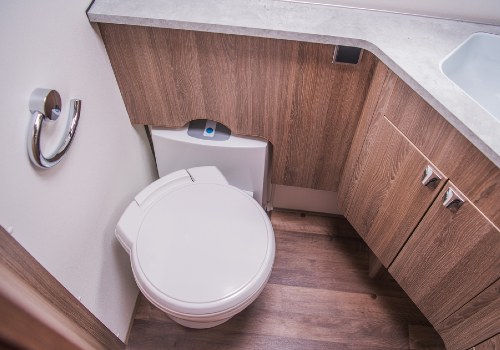
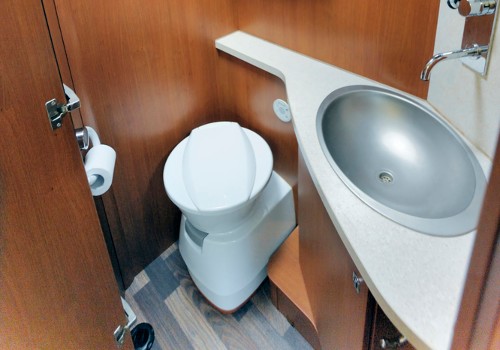
The standard gravity flush RV toilet (Amazon link) is different than the one in your home in the way it looks, flushes, and the disposal of waste.
RV toilets have a bowl, seat, and lid but lack the water tank at the back of a residential toilet, making them more compact and ideal for small RV bathrooms.
The water to flush the toilet and fill the bowl arrives by pressing down on a foot pedal near the unit’s base. A few RV toilet models have a flush mechanism at the back of the bowl near the lid.
Different RV toilet models will locate the foot pedal either straight in front of the base or on the right-hand side.
The foot pedal has a two-part setting that takes some practice to master. By pushing down part-way on the lever, the water is released into the bowl through the holes near the upper rim.
By pushing the foot pedal down all the way, the water runs while simultaneously opening the bottom flange to flush away the waste.
The RV black water tank sits directly underneath or near the toilet, so only a short section of pipe is necessary to connect the toilet drain to the tank.
When you flush the RV toilet, the waste will drop into this holding tank and remain there until you empty it at an RV park, dump station location, or even at home.
How to Use an RV Toilet Correctly
The first few times you use an RV toilet, it may seem troublesome, but soon it becomes second nature.
Here are the three steps to use a standard RV foot-pedal flushing toilet:
Step 1. Plan for Your “1” or “2”
If you only plan to urinate, go ahead and use the toilet as is.
If you plan to poop, you’ll need to first push down part-way on the foot pedal to fill the toilet bowl up at a minimum half-way with water before you do your business.
Step 2. Flush the Toilet
For a good flush, push the pedal down completely and quickly so all the waste and water in the bowl drop suddenly into the black tank below.
Slowly opening the flange at the bottom of the bowl will cause the liquid to empty and leave the solids stuck in the bowl. Trust me, this is the last thing you want to happen, especially after a #2.
Step 3. Rinse, Then Add Water
After flushing, push the pedal partway and let the water rinse off the sides of the bowl if there’s any residual mess. You can also get out the toilet brush and swipe the tank.
Flush the tank again if you feel the need.
When the toilet bowl is “clean,” you now need to add about an inch or so of water to the bottom so the rubber gasket around the flange stays wet.
Some toilets will automatically add this water after a flush, but most will need a boost by pressing partially down on the foot pedal until at least an inch of water is in the bowl.
Now, the RV toilet is ready for the next use.
3 Types of RV Toilets
Not all recreational vehicles will have the same type of toilet. Here are some other types of toilets you may encounter in an RV.
1. Composting Toilet
Composting toilets for RV use are very popular in smaller travel trailers, campervans, truck campers, and Class B motorhomes, but any RV could have one.
Composting toilets do not require a water supply to work, making them an excellent solution for small campers, RV renovators, or eco-friendly RV enthusiasts.
The toilet uses straw, peat moss, sawdust, or other absorbent and organic material to collect waste and microbes to break down the solids.
Excess liquid from urine will drain off into a separate canister for disposal as necessary, while the solids will need removal every 6-12 weeks.
Composting toilets are beneficial for RVers who often boondock, as you don’t have to worry about emptying a black tank. The price of composting toilets (Amazon link) is much higher than a standard gravity flush RV toilet.
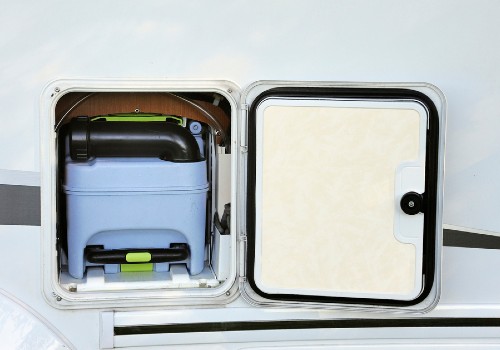
2. Cassette Toilet
A cassette toilet for RVs is permanently installed in the bathroom of the camper, but the black tank is portable.
Once the waste tank is full, you remove the whole unit from your recreational vehicle and empty it at a dump station or other acceptable location.
The portable tank is similar to a honey wagon (Amazon link) and has wheels for easy transport.
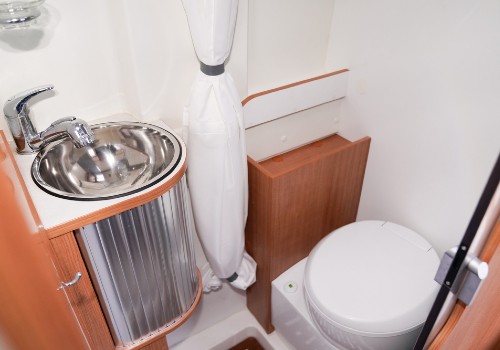
3. Portable RV Toilet
The most economical and compact type of RV toilet is a portable version you can place anywhere in your camper.
Most portable toilets have a refillable freshwater holding tank to flush the unit after use, but some require the manual addition of water from a jug to rinse the bowl.
Portable RV toilets (Amazon link) can cost about the same as a gravity flush model, but the small holding tank fills fast.
The waste will drop into the lower tank, and you remove this tank to dump it at a safe disposal location.
4 RV Toilet Tips
1. Swap Out the Toilet Seat and Lid
The majority of RVs come with a standard gravity flush toilet model. The unit is either all plastic or has a porcelain base, a plastic seat, and a lid.
My first tip for new RVers or those who use their toilet often as a “chair” is to swap out the plastic seat and lid for a wood one.
Sitting on the plastic lid bends it and will eventually crack the cover.
The entire plastic seat and lid also move about much more easily than a wood version that fits your RV toilet brand. Sitting down to do your business and having the commode seat slip off the rim of the toilet is frustrating and dangerous.
2. Get a High-Rise RV Toilet
Many RV toilets are low-rise and are often at an uncomfortable height for adults.
Swapping out a low-rise toilet that’s only 14 inches tall for a standard-rise version at 18 inches in height is going to make your life much easier.
Not having to squat to get up and down when using the toilet is very nice, and making the change to a taller RV toilet isn’t very difficult or expensive.
3. Carry Spare RV Toilet Parts
When putting together your traveling RV repair kit, add in these items (specific to your toilet model):
- Flush ball seal
- Water flush valve
- RV toilet seal lubricant
The top two parts are the most common ones to fail and the top reasons your RV toilet doesn’t hold water or leaks. Replacing either part is a relatively straightforward DIY fix.
The lubricant works to prolong the life of your toilet seal and helps it avoid any accumulation of debris.
A dirty, old, or damaged seal will cause your RV toilet to leak out water just as a bad flapper will on a residential toilet.
A flush valve sits outside the toilet base behind the foot pedal. In most cases, the valve is where the RV cold water line connects to the toilet.
The flush valve allows water to flow and stop during a flush. A bad valve will keep leaking water into the RV toilet bowl or onto your camper floor.
You never know when your toilet will have issues, but most certainly, it’ll be in the midst of a fun RV vacation and far from any store carrying replacement parts. Having these supplies on hand is crucial to keep your plans on track.
4. Skip the RV Specific Toilet Paper
There isn’t any need to pay more for TP made for RVs because they don’t break down any faster than most standard toilet paper brands.
For a good visual, watch this video on how different brands compare to the RV-friendly TP.
Most RVers leave their black tank closed for several days before dumping. Unless you’re buying and using lots of super-thick quilted toilet tissue, you’re not going to have any problems with clearing your tank and sewer hose when it’s time to dump.
I buy whatever TP is cheapest at the store, and in seven years of full-time RVing, I haven’t had a single toilet paper-related issue.
RV Septic Safe vs Regular Toilet Paper Test (Video)
RV Toilet Frequently Asked Questions
Can You Install a Residential Flushing Toilet in an RV?
Technically, yes, you can install a residential-style toilet in your RV, but it won’t be an easy replacement option nor be very functional.
Want to Connect With a Community of Over 1,078 RV Enthusiasts?
Traveling with a residential toilet could cause damage from rattling the heavy porcelain water tank or water sloshing everywhere.
The movement during travel may also swish away the water that should always be in the trap of the toilet, causing foul sewer gases to rise into your camper.
The space required to add a toilet with a rear water tank will be challenging to find inside a tight RV bathroom.
Getting a good connection between the toilet, the floor, and the black water tank will also be problematic.
The amount of water you’ll use by having a fully-flushing residential toilet will mean emptying your waste tanks probably every day or two and draining your freshwater reservoir just as fast.
The only people who should consider this option are full-timers who are already planning a major RV bathroom renovation, have a huge-capacity blackwater tank, own a park model, or plan to keep their camper at a campsite long-term.
Should You Keep Water in the RV Toilet?
Yes, you should always keep some water in a recreational vehicle toilet for a couple of reasons.
The first and most important reason for the water is to keep the rubber gasket around the flushing flange from drying out. If it dries out, the rubber will shrink and crack, preventing your toilet bowl from holding water.
The water also acts as a barrier to prevent a backdraft of odors and harmful sewer gas from emanating up from your black waste tank and into your camper.
The key is never to add too much water during travel days, as the water can easily slosh out when the motorhome or travel trailer is moving. A half-inch of water is more than enough when on the road, and several inches is better when at your campsite.
Don’t overfill your toilet bowl after each flush. Doing so uses up your freshwater holding tank supply quicker and fills up your black tank faster.
For months-long storage of your RV, fill your toilet with water and cover the bowl with plastic wrap to slow down evaporation.
What Should You Never Flush Down an RV Toilet?
RV toilets and sewer components can easily clog if you aren’t careful.
Never flush:
- Excessive amounts of TP at one time with little water
- Feminine products or diapers
- Flushable wipes or baby wipes
- Harmful chemicals
- Greasy substances or food
- Paper towels
As an RVer with workamping experience, dealing with guests with clogged sewer pipes within their RV or clearing out campground sewer lines was a nearly daily occurrence.
The biggest culprit for clogs was grease build-up in the pipes and so-called “flushable” wipes that take months to degrade. Tampons and, believe it or not, diapers were the next highest items we would pull from the pipes.
Remember that gravity is what clears away debris from your toilet, out the RV, and down the campground sewer lines to the pump station. It doesn’t take much for clogs to form, so use plenty of water and avoid the list above to make everyone’s RVing life easier.
Can You Use an RV Toilet While Driving?
If you’re in a motorhome and nature calls, there’s no reason people in the camper cannot use the toilet when you’re driving the RV.
For travel trailers, you can still use the toilet during breaks wherever you stop and can safely and legally enter the trailer.
Aside from bracing yourself against any motion or bumps from the road, the RV toilet’s function should work fine.
Depending on your recreational vehicle, you may need to manually add water to the bowl for flushing and rinsing the toilet if you can’t operate the freshwater pump while in motion.
Flushing of toilet water will still go directly to the black tank and stay there until you reach a dump station or campsite with a sewer drain.
Final Thoughts
RV toilets will take some practice to train yourself on after years of using and flushing a residential toilet, but they certainly aren’t difficult to manage.
Knowing how camper toilets work is another step toward mastering all the skills you need to be a self-reliant RV owner.
I hope this article helps you with the learning process, and my tips make installing, fixing, and using your RV toilet much more comfortable and convenient!
Proper RV Toilet Operation (Video)

")


"Man cannot discover new oceans unless he has the courage to lose sight of the shore."
-- Andre Gide


")
