")
Rving is all fun and games, that is until it’s time to flush and clean the black tank.
Do it poorly, and you and everyone at the campground will smell your failure!
Emptying RV wastewater, which includes the black and gray water tanks, takes hands-on practice to master.
But for new RVers, knowing how the plumbing system works and the correct order to empty and clean the black tank is the only way to becoming confident in performing this necessary duty.
That’s why I put together this must-read guide to flushing and cleaning RV tanks to help you out. I also toss in helpful tips at the end.
So, stay right here to learn all you need to know about RV black tank flushing and cleaning to avoid smells, messes, and campground embarrassment!
How an RV Wastewater System Works
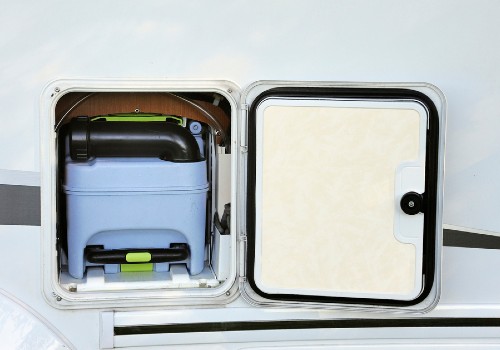
Most RVs, even those without toilets, will have a wastewater tank system.
A black water tank is to hold the liquid and solid waste after flushing the toilet. A gray water tank collects dirty and soapy water from RV sinks and showers.
Some smaller RVs combine wastewater into one tank, but most RVs will have two or even three tanks for collection between dumps.
Each tank will have a venting system that comes out the top of your camper to allow the tanks to drain efficiently.
Both black and gray versions have tank sensors that send signals to your main RV monitor panel to indicate how full each tank is so you know when to empty them.
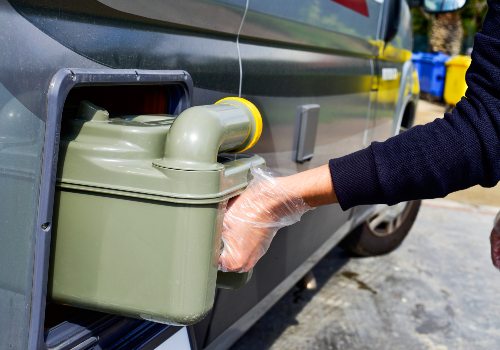
The bottom of a tank has a large (usually 3 to 3 1/2″) pipe that comes out and terminates with a cap near the outer edge of your RV.
There is a black tank valve in this pipe to stop wastewater from flowing out of the line until you’re ready to empty the contents. There’ll also be a pipe with a gray tank valve to control the gray holding tank flow.
Most RVs merge these two pipes before the final termination of the line near the outer edge of your camper, typically at the rear or backside rear of the rig.
The last components of an RV wastewater system are the detachable sewer hose and sewer connection fittings.
Steps to Flush and Clean an RV Black Tank the Right Way
When it’s time to flush out the black tank, you’ll need a sewer hose and end fitting to connect to the sewer line at your campsite or the dump station.
Many RVers choose to wear disposable gloves for the black tank flushing task, while others prefer thorough handwashing when done. I find the gloves a nuisance when trying to twist sewer pipe caps and hose connections on and off as they slip around and often tear.
Step 1. Make Sure Your Tank Is at Least 1/2 to 3/4 Full
The more fluid in your tank, the better it will flush away waste and toilet tissue.
If the black tank isn’t full enough, hold the flush lever down on your toilet and let the water run in, or fill gallon water jugs from the spigot outside and dump them down your toilet until it’s high enough.
Step 2. Connect Your Sewer Hose to the Camper’s Sewage Pipe
Remove the end cap from your camper’s sewer drain pipe.
Take one end of your sewer hose and push it onto the end of the sewer drain pipe coming from your RV.
Twist the end until it locks in securely over the tabs so it won’t fall off when the wastewater begins to flow out of the black tank.
Step 3. Locate and Remove the Sewer Line Cap
Most sewer line caps are round white PVC with a raised square center you can grab to untwist it from the pipe.
The pipe is normally 3 1/2 to 4″ in diameter and sticks up a few inches from the ground. The sewer line is generally at the rear of an RV campsite.
Grab the raised center on the cap’s top and twist toward the left to remove it from the pipe. If the cap is stuck, use channel locks for more leverage to work the cap out of the pipe.
Step 4. Place the Correct Fitting Onto the in-Ground Sewer Line
You need to connect a fitting to seal the sewer hose to the main sewer line.
Most RVers with experience opt for a universal RV sewer fitting for this task.
The screw-in adapter twists into the ground pipe. The 90-degree fitting has tabs to lock onto the other end of the sewer hose.
Some RV sewer hoses do not have a plastic fitting at the end to attach to such a connector.
For a plain-end sewer hose, you’ll need to have an RV sewer donut to dump your black tank cleanly. A donut is a round, flexible foam fitting with a hole in the middle that fits a standard-width RV sewer hose.
You push your donut partway into the open sewer line, then push your straight sewer hose end into the center hole so it stays secure while you dump the tanks.
Step 5. Ensure Fittings Are Tight, Then Empty the Black Tank
Once you connect the sewer hose firmly, pull the valve lever on the black water tank pipe to release the fluid. Once the black tank is empty, close the valve.
Locate the gray water tank valve and pull it open. Allow all the fluid to run from the gray tank, and then shut that valve.
Step 6. Begin the Cleaning and Flushing Process
Now that your black tank is empty of general waste and connected correctly to the sewer line, it’s time to loosen stuck-on debris and flush the tank by following the steps below.
Steps to Correctly Flush an RV Black Tank
Step 1. Break Down Solid Matter Inside the Tank
Use a strong enzyme cleaner made to dissolve RV black tank matter that may build up inside the container.
Fill the black tank 3/4 full of water, then drop in the appropriate amount of cleaning product for your tank capacity down the toilet. Now is not the time for homemade black tank cleaning products or general deodorizing black tank tablets.
Let the chemicals work on any trapped waste products within the tank for several hours or overnight, then drain the tank by going outside and pulling the black tank valve open.
Close the black tank valve, but leave the sewer hose attached to the sewer line for the next step.
Step 2. Backwash the Black Tank Using the Flush Valve
Backwashing the black tank can eliminate any remaining built-up waste stuck on the floor and walls. Debris quickly piles up in the corners and bottom of camper black tanks and causes offensive odors.
Backwashing forces water into the tank, and the pressure will lift debris so it can rinse out the drain pipe.
Some RVs have a flush valve built-in to the plumbing system, while others have an aftermarket tank valve and flush unit you can install on your camper so you can connect a water hose and backwash your tank.
When ready, hook your hose onto the tank flush nipple, open the black tank valve, apply water pressure to the hose, and start flushing out the tank.
Watch the water flowing out of the tank through the transparent section of the sewer drain hose fitting. Keep rinsing the tank until the water flowing out is clean with no chunks of debris.
Turn off the water and close the black tank valve. Remove the water and sewer hoses and put everything away.
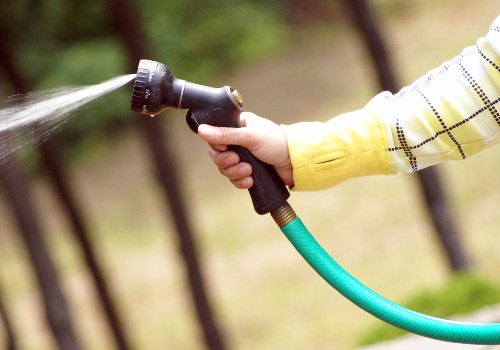
Step 3. Use Hand-Held Tank Sprayer if You Don’t Have a Backflush Valve
You can purchase a portable RV tank sprayer to pressure wash your black tank clean by going through the bottom valve inside your RV toilet bowl.
With your sewer hose attached to the camper and sewer line, open the black tank valve so the black tank will drain as you spray into the tank.
Using a garden hose at the end of a flexible sprayer wand, press down on the toilet flush pedal to open the valve in the toilet bowl and lower the rod into the black tank.
Open the shut-off valve on the wand to release the water pressure and move the sprayer around to dislodge debris off the black tank walls and floor. Shut the valve on the sprayer and remove the wand when done.
Want to Connect With a Community of Over 1,078 RV Enthusiasts?
Release the foot pedal on the toilet to shut the flange in the toilet bowl. Take the hose outside, close the black tank valve, and remove the sewer hose.
7 Tips to Make Your Black Tank Flushing and Cleaning Less Stressful and Messy
Step 1. Less Waste in, Less Waste Out
Avoid pooping in your RV when possible, never flush feminine products, never use flushable wipes, or overuse toilet paper.
All of these actions add up to a stinkier bulk of waste that is hard to dissolve and easily clogs up your pipes and hoses.
Trying to clear a clog from RV plumbing lines is never pleasant, trust me.
Step 2. Let Plenty of Water Flow During Flushes
Don’t skimp on water flow when flushing the toilet. Try to keep a ratio of 3/4 fluid to 1/4 solids so there is more chance the material can break down before you dump the tank.
Don’t forget to use an effective enzyme chemical tank treatment to dissolve matter and reduce odors.
Step 3. Buy a Sewer Hose Support
A sewer hose support is like a little bridge to hold the drain hose securely and at the proper angle so the wastewater can flow freely to the sewer line.
Using support means you can empty the black tank without needing to lift the hose to force out the remaining waste, so you stay cleaner.
Step 4. Place Your Foot on the Connection Fitting When You Dump
Ask someone to open the black tank valve while you firmly step on the connection fitting where the sewer hose empties into the main sewer line.
Why is this important?
Doing this prevents the parts from popping apart when the force of the fluid from the tanks hits the connections and spray sewer water all over you, your camper, and your campsite.
Every RVer will eventually have this happen no matter how certain they made tight connections, so keeping a foot on the fittings is a critical rule to follow when you dump your RV tanks.
Step 5. Add a Siphoning Sewer Vent Cap
Sewer gas backdraft is common and a quick way to fill your camper with a horrible stench. Adding a siphoning sewer vent cap that lets air out but won’t let it back in will keep your RV fresh.
Some caps also add a screen to keep bugs out too! These caps are inexpensive and super easy to install.
Step 6. Have a Stash of Extra Sewer Fittings and Length of Sewer Hose
If you plan to RV often, it’s wise to have a complete arsenal of sewer supplies. Carry an extra 10 to 15-foot sewer hose that attaches to your current hose in case your campsite sewer connection is too far away.
Get a universal sewer pipe screw-in adapter to handle any diameter of pipe, plus a donut in case the fitting on your sewer drainage hose gets damaged and you need to cut it off. Have at least one spare clear 90-degree adapter and another that loads the hose from the top.
The more options you have when hooking up your sewer dump hose reduces the chance sewer water will leak onto you or your campsite.
Step 7. Prepare a Handy Tank-Dumping Kit

Keep a tote full of:
- Paper towels
- Large rags
- Disinfecting wipes
- Rubber gloves
- Channel locks
- Small plastic bags
Grab the tote and take it outside every time you empty the RV waste tanks so you have everything you need to instantly set up and clean up at your campsite or dumpstation.
Final Thoughts
A happy camper is one who keeps RV odors to a minimum and doesn’t make a stinky campsite mess while dumping their camper’s black and gray holding tanks.
Follow the steps and tips above to flush and clean an RV black tank the right way, and you’ll look like a camping pro from day one!
How to Clean an RV Black Tank with the RV Swivel Stik (Video)


")

"Man cannot discover new oceans unless he has the courage to lose sight of the shore."
-- Andre Gide


")

I have a Flagstaff 30’ travel trailer 2012 and having problem with sink draining causes backup in shower. Can you tell me how to stop this from happening. Have to run pipe into opening and giggle back snd forth to get outlet opened to start emptying out.
Thanks
Joe
This is amazing, keep up the good work. Appreciate all the efforts you put in here. Stay safe!
FINALLY! A video that REALLY explains and demonstrates a key step in rv ownership. Our travel trailer is in a seasonal lot and has not been moved by us for 4 years. We’ve NEVER flushed out our system! We know to drain it, and add organic odor eliminator, but was never given instructions to CLEAN our tanks. We didn’t use the camper often while we worked, but now that we’re retired, we have a chance to enjoy being a bike ride away from the beach. Needless to say, we are experiencing some unpleasant odors now…makes us not want to return from the beach…This changes things! THANK YOU! (never too old to learn) 🙂