
New RVers have a lot to learn, including how to sanitize the RV water tank properly.
With peak camping season just around the corner, now is the time to prep your RV so your fresh water tank is free of bacteria and debris.
To show you how to sanitize your RV water tank efficiently, I put all the details right here, including:
- Why sanitizing an RV water tank is important
- What products are best for the job
- Steps to completely clean your RV water tank system
- Tricks to keep your RV water tank bacteria-free
With the right supplies and method, you’ll blast through this necessary RVing chore and be on your way to safe and fun camping adventures!
The Importance of Sanitizing Your RV Water Tank
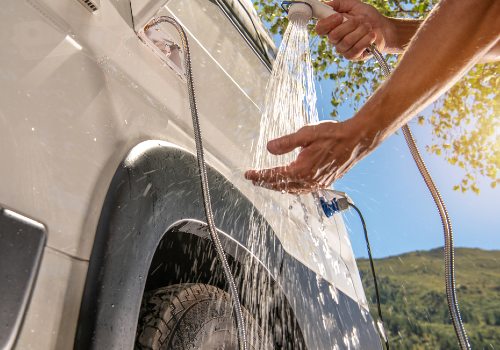
Most RVs have a holding tank for water that campers use to wash hands, brush teeth, shower, flush toilets, or clean dishes.
Most RVers utilize this water source during:
- Road travel
- Dry camping trips
- Water outages at campgrounds
Because the water you store in your RV water tank is for personal hygiene, some of this water may get ingested, so it’s imperative it remains free of harmful bacteria or chemicals.
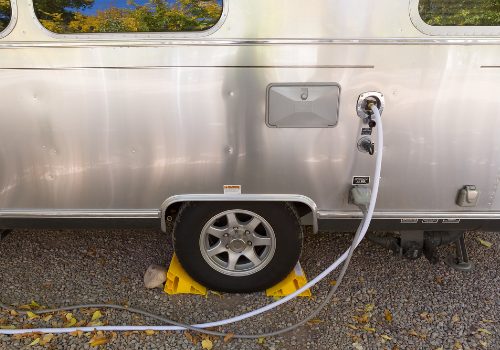
RVers generally fill their holding tank with potable water from a home, campground, or dump station hose.
While, technically, the water is coming from a “clean” source, it’s often traveling into your camper via a garden hose that may harbor bacteria or other pathogens.
While most RVers refrain from drinking the water from their storage tank to avoid potential stomach upset, it doesn’t mean you can neglect its cleanliness. There may be times that the holding tank is the only source of drinking water you have.
Illness from unsanitized water tanks is a real threat, and stagnant or bacteria-filled water can form quite a stench.
Sickness from nausea to diarrhea is common from water-borne diseases caused by viruses, parasites, or bacteria that can increase inside your RV water tank.
No one wants to worry about their water’s health and safety while on a camping trip, so ensuring your water tank sanitation duties are up to date is the best way to prevent this issue.
Even if you have a water filtration system in your recreational vehicle, it could miss microscopic germs that can make you sick.
Maintaining a clean, freshwater tank should be a top priority for all RV owners, and thankfully, it’s not a difficult task once you know the steps.
How Often Should You Clean an RV Water Tank?
The cleaning schedule for RV water tanks varies depending on who you ask.
Some people only sanitize once a year, as they ready their RV for camping season. This single cleaning may be sufficient for people who only camp 3-6 months, then put their RV in storage.
Experts recommend sanitizing the water tank at a minimum every six months to keep germs in check.
For full-time RVers, those who boondock camp often or those prone to illness should clean the water tank even more often. Some owners clean their tank monthly, while others do it every two to three months.
Your personal needs and how you use the water from your RV holding tank will determine the best sanitizing schedule.
The Best Products for Sanitizing an RV Water Tank

There are several supplies and products you should always keep on hand to sanitize your RV water tank which include:
- Inline external water filter
- Bleach
- Funnel
- 5-gallon bucket
- Measuring cup
- RV fresh water hose
Most RVers find using bleach the easiest and least expensive method to sanitize the water tank.
Some RVers choose to use a two-part system. The first part of the system uses a detergent to break loose any debris from the tank and water lines, while the second part sanitizes the components.
The main issue with a two-part system is the extra steps of cleaning the water tank and lines and then rinsing and filling the tank with the sanitizer and rinsing again.
Many people also complain that the detergent taste and foaminess are hard to eliminate, even after several full tank rinses and weeks of use. For these reasons, I highly suggest using bleach to sanitize RV water tanks.
6 Steps to Clean and Sanitize Your RV Water Tank
You’ll need to plan before you begin your RV fresh water tank sanitizing, as the whole process requires a good 12 hours for the effective elimination of bacteria and viruses.
You’ll only need an hour or so for the initial steps, but the water and bleach need to sit in the tank and water lines, so you can’t be using the camper, as usual, to flush the toilet or run the sink to wash dishes.
Step 1. Turn off the Water Heater and Pump, Then Drain the Water System
You don’t want to damage your water heater by sanitizing the system with the unit on. Turn off the water heater and allow the tank to cool before you begin.
Some RVers prefer to bypass the water heater during sanitation, while others want their entire water system clean.
Open the drain plug for the RV water tank and allow at least half of the water to drain out. If you’re actively using the camper and the water is a recent addition, you can leave half the water in the tank during sanitization.
If the tank water is old or looks funky, drain all the water out.
To quickly eliminate all the water from the plumbing lines, open faucets, and the shower to let air into the system.
Once the water is out of the tank and lines, replace the drain plug and close any open faucets.
Step 2. Add Bleach Solution and Refill Tank
To add the correct amount of bleach to effectively kill germs without overwhelming the components, you need to have a ratio of one cup of bleach for every ten gallons of water in the tank.
Most RV water tanks are 30-60 gallons, so you’ll need around 3-6 cups of bleach.
Do not add the bleach straight into the tank. It’s better to dilute the bleach in freshwater first inside a bucket.
Fill a five-gallon pail about halfway with clean water and use a measuring cup to precisely add the bleach to the bucket in the proper ratio for your size tank. For example, use 4 cups for a 40-gallon tank.
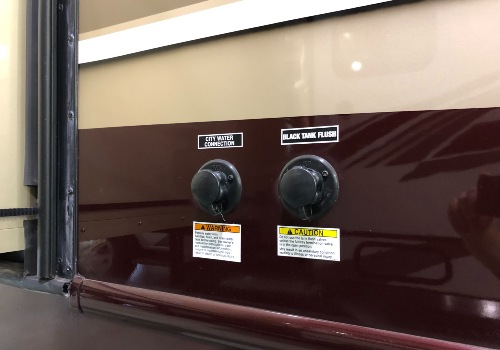
Using a short hose or long funnel connected to your water tank intake port, pour the bleach solution into your water tank. (Make sure you have the drain plug shut before you start.)
Some RVs have water tanks with easy access. If your camper does, you may be able to add your bleach solution via the access cap on the top of the tank instead of from the exterior intake port.
After you add the bleach water, top off the tank using your regular water hose and spigot. You want the water going into your tank to be as clean as possible, so I suggest using an inline water filter on your hose when filling the tank.
Step 3. Run the Bleach Water Through the RV Plumbing System
Now that the water tank is full turn on your water pump and open all the faucets and shower in your camper one at a time. Flush the toilet several times.
You’ll need to watch the contents of your gray water tank and open it if the level is high so excess water can drain from the RV.
Let the water run a minute or two at each tap until you smell bleach, then close each faucet.
After you finish drawing the bleach water into all the RV plumbing lines, turn off the water pump and top off the water tank with more freshwater.
Step 4. Allow the Bleach Water to Soak
The key to getting full RV plumbing system sanitation is to allow the bleach water to sit in the RV’s tank and lines for 12 hours minimum.
Most RVers let it soak overnight, but there’s no reason to go more than a full day.
Step 5. Drain and Flush the Tank and Plumbing Lines
After 12 hours, it’s time to drain off the bleach solution and flush out the system.
The ratio of water to bleach shouldn’t be harmful to the environment when you drain the tank and pipes into a sewer system or onto the ground, but you may want to verify what the local or campground rules on dumping are first.
Open your water tank drain and a faucet or two and allow all the water to empty out of the RV.
Once the tank drains, close the plug and refill the tank with freshwater. Make sure at this stage that your grey wastewater tank valve is open.
Want to Connect With a Community of Over 1,078 RV Enthusiasts?
Turn on the water pump and allow the water to flush out all your water lines for both hot and cold sides of sinks and showers. Flush the toilet a few more times.
After a few minutes, you should not smell bleach. If you do, you can stop and repeat the steps of draining the tank and lines and refilling for another flush.
If the bleach smell remains but is very slight, you can keep using your freshwater tank for showers and washing up over the next week to purge the remaining odor, but you may want to avoid brushing your teeth with or drinking the water until the bleach smell dissipates.
Once you’re satisfied with your RV water tank’s cleaning and sanitization, close your gray water valve if you typically keep it shut.
Step 6. Turn on the Water Heater and Swap Filters
Now that your water tank and plumbing lines in your RV are clean, you can turn your water heater back on.
If you bypassed the water heater during the cleaning, make sure you open the valves to return water flow in and out of the water heater tank.
If your RV has a water filtration system separate from your exterior inline water hose filter, now’s the time to clean or replace the filter so your water is as clean as it can be.
Tricks to Keep Your RV Water Tank Germ-Free
Make Use of RV Water Filters
Always use an external inline water filter on your water hose, even if you have an internal water filtration system.
External filters weed out large particulates like rust and catch viruses and bacteria before they enter your RV water tank. Some filters, like the Culligan RV-800, help remove excess chlorine and improves taste and smell.
Keep Water Tank Entry Point Clean
Take care to keep your water tank intake port clean to avoid introducing mold, germs, or debris into your RV water system.
Using a disinfecting towelette or a bleach-water solution on a rag to wipe down the water port’s outer portion will kill germs and remove dirt.
Keep the cap on the filling port when not hooked up to a hose to stop dust, dirt, insects, or leaves from getting into the holding tank.
Keep a Clean RV Water Hose
Always have a dedicated hose for potable water and keep it clean, especially if it’s been sitting in storage for long periods.
Never allow the ends of your RV water hose to touch the ground. Don’t touch the ends of the hose with dirty hands, or use the hose to rinse out any part of your sewer drain hoses or connectors.
You can use the ratio of 1/2 cup bleach to five gallons of water to fill up the hose to eradicate bacteria. Use a funnel to fill the hose. Keep both ends propped up enough to hold the liquid and let it sit overnight.
Will Water Sanitation Tablets Work in an RV Water Tank?
Hikers love bringing lightweight water sanitation tablets on long treks so they can drink water from streams or lakes without fear of getting sick.
Since the tablets work so well to kill a wide array of bacteria and viruses, many RVers think adding them to their freshwater holding tank is fine.
The premise behind this idea is clever, but the practicality of adding such tablets to your RV water tank isn’t so simple.
Getting the small tablets into the tank is the first issue. Most RVs have a screen inside the intake port that prevents items from falling into the tank.
The second issue is figuring out how many tablets you’ll need to treat all the water in your tank. Sanitizing tablets are for cleaning small batches of water for drinkability, not large containers.
Final Thoughts
A clean and fresh RV water tank gives you peace of mind while camping that all your showers and washing up won’t come with nasty germs or offensive odors from the water.
Sanitizing a water-holding tank may seem like a challenge, but once you go through all the steps one time, you’ll see it isn’t that bad.
Now that you know how to sanitize your RV water tank, you’ll easily avoid water-borne illnesses or foul smells and will see that the results are well worth the effort!
How to Sanitize an RV Water Tank – Do It Yourself (Video)
")


"Man cannot discover new oceans unless he has the courage to lose sight of the shore."
-- Andre Gide


")
