
RV slide topper replacement doesn’t have to cost a fortune, nor do you need to hire a professional to do the work.
Any recreational vehicle owner can measure, order, and replace an RV slide topper, often with a higher-quality material, and still save money in the process.
To learn how to DIY an RV slide topper replacement, follow the steps and tips in this guide. Inside, you’ll learn how to take the correct measurements, where to order the new slide topper and the best way to remove the old topper and attach the new one.
RV slide toppers help prevent water leaks and control interior RV temperatures by protecting the roof of slideouts, so replacing them as soon as you see damage or deterioration is the best way to keep your RV in top condition!
How to Measure for a Replacement RV Slide Topper
Not all RV slide toppers are made by the same manufacturer, but the most common brand is A&E, which will be the one I explain in this guide.
Other brands, like Carefree, Solera, and RecPro, will follow a very similar RV slide-topper replacement system so that you can use the information here as a reference, along with brand-specific instructions.
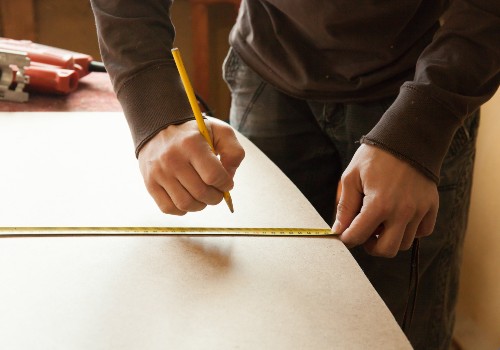
You’ll need to take measurements on your slideout roller arm to ensure your replacement topper will fit properly.
Open up the slide fully to expose the roller arm and side of the box to take your measurements.
Get up on a ladder or your RV roof, depending on how deep the slide is, and take the first measurement across the roller bar from the inner edge of one metal end cap to the inner edge of the cap on the other end.
The second measurement will be how far your slide box extends from the RV. Place the tape measure behind the flange around your slideout, pull it outward to the outer edge of the slide box, and record the length.
Check out this RV slide topper measurement video if you’re unsure what this step entails.
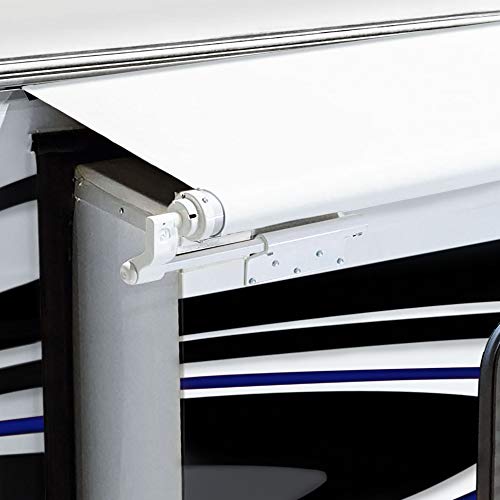
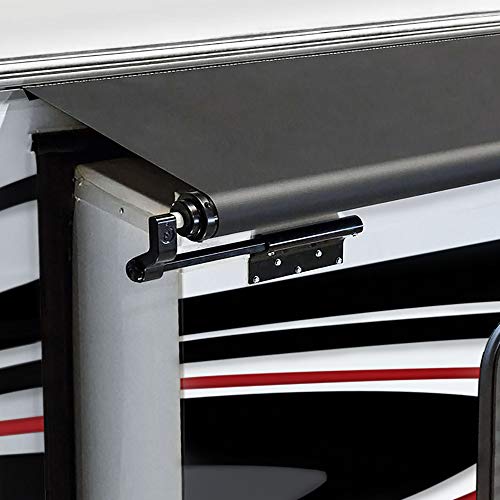
Also, note how the topper attaches to your RV. Does it extend from a metal wrap along the upper edge where it connects to your recreational vehicle, or does it slide into a track?
That’s it. You now have the measurements you need to order a replacement RV slide topper for an A&E and other brands with similar mechanisms.
Keep this data in your RV repair journal for future reference.
Please check with any slide topper manufacturer before ordering, as each site may require additional measurements for a precise fit.
Where to Buy RV Slide Topper Replacements
- Our largest replacement slide topper fabric can be easily cut down to fit slide-out rooms ranging from 160” to 200” and it can…
- With a tensile strength of 140 PSI, you can be sure that it’ll stand up to the test of time. Once trimmed to properly expand…
- This slide-out awning is available in black or white, classic colors that fit any exterior color scheme. Easily cleaned with our…
You have several choices when buying a replacement for your A&E slide topper, including:
- OEM factory replacement straight from A&E
- Custom replacement by independent RV awning companies
- Plain awning topper material you cut and sew yourself
Most RVers take the easy route and order a slide topper replacement from A&E because they know the color will match their camper, and the fit should be perfect.
There is nothing wrong with buying an OEM replacement for your RV topper, as it makes the delivery and installation of the material quicker. Still, the material isn’t as thick as you can purchase through other vendors.
Custom RV awning and slide topper companies, such as RecPro or Carefree, are another option that allows you more control over fabric type, color, and thickness.
More care goes into each topper replacement, with double-stitching on seams and more durable fabrics and threads for a longer lifespan.
Surprisingly, ordering a custom-fit slide topper replacement from these companies is often cheaper than purchasing a standard A&E topper, which will last much longer.
If you possess sewing abilities and have access to a robust sewing machine, you can purchase replacement fabric for RV slide toppers and undertake the task yourself.
You can also contact any custom-made RV topper company to inquire if they will sell you fabric by the yard to sew new toppers yourself.
Steps to Replace an RV Slide Topper
Before beginning the task of replacing your RV slide topper, gather up a friend or two to help. The more hands to work getting the new topper material in place, the faster and easier it will be.
You’ll need a ladder or two to reach the slide topper roller, a screwdriver with the correct head for your awning hardware, duct tape, a razor knife, and some spray lubricant. You’ll also want to have some quality RV sealant caulk on hand to repair any gaps you spot on the slideout.
This RV slide topper replacement method does not involve removing the roller tube from the camper, so the whole process will take less time.
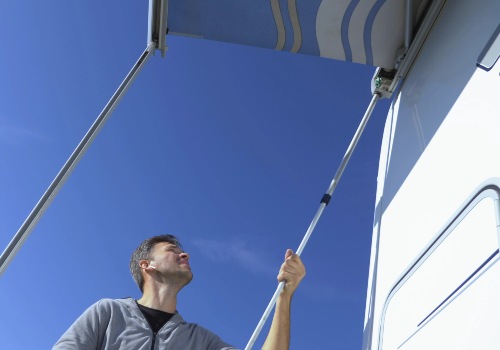
Step 1. Open the Slideout and Set Up Ladders
You want to fully open the side and place a ladder on either side to reach the roller ends.
If your slide is deep, you may do some topper replacement work from the roof of your RV. However, thinner slides can have all the work done from the ladders, as you can reach both the roller and the attachment at the RV with little effort.
Step 2. Remove Anti-Billow Screw and Bracket, and Unroll Topper
The next step involves removing the screws and covers for the anti-billowing device. This device is located between the metal end cap and the arm of the roller mechanism and will expose the slot where you can control the roller movement.
Once the end piece is off, you can have a person on each end of the slideout start rolling the tube toward the RV in a counterclockwise direction.
Expect tension on the roller, so be careful, hold it tight, and work slowly until you get to the end of the old topper material.
Once you get to the end of the topper, where it attaches the roller, turn the slot upwards and stick a metal rod (an Allen wrench is a good option) into the slot at either end of the tube to keep it from rolling up.
You should find the location of all these components in your slide topper user’s manual.
Step 3. Remove the Old Slide Topper
Now that you have full access to the topper material, you can slide it out from the RV gutter or metal cover track on the inside edge of the slideout and from the groove down the length of the roller tube.
Look for set screws in the tracks on either end about an inch or so in to keep the material in place. These will need removal so the topper can slide from the channel, but not all slide-outs will have them.
If you apply a lubricating spray to the tracks, it will make slipping out the material much more manageable.
If you have no plans to reuse the old topper material, you can simplify the removal task even further by using the razor knife to cut it in half so you can slide out each piece of material from the track separately.
Replacing an RV Slide Topper (Video)
Step 4. Clean, Caulk, and Lubricate the Slide Topper
Before installing the replacement RV slide topper, take the time to clean the tracks and top of your slideout with dish soap and water.
Inspect the edges all around the top of the slide and recaulk any areas that look thin or have gaps.
Once the slideout is clean and watertight, use the lubricant on any slide topper mechanisms and inside the inner and outer tracks where the new material will slip in.
Step 5. Begin Installation of New RV Slide Topper

- RELIABLE PROTECTION — Slide Toppers help prevent dirt, bird droppings, debris and more from falling on your RV’s slide-out —…
- MULTIPLE SIZING and COLOR OPTIONS — Fitting slide-outs ranging from 66” to 192” and available in black or white fabrics,…
- TESTED FOR DURABILITY — The 13.5 oz vinyl has been rigorously tested to withstand -25 degrees Fahrenheit, so it won’t crack in…
- STYLISH and ECONOMICAL — This slide awning is a practical, economical was for you to protect your slide-out from costly damage,…
- DIY INSTALLATION — This assembly comes complete with everything needed for an easy installation — including slide-out topper…
The edge ends of the metal track where you’ll slide in the new topper are often sharp, which can slice the material as you feed it into the track.
A great tip is to rip off some short sections of duct tape and place a piece on both the upper and lower edges to buffer the material from direct contact with any sharp edges. Some people like to file down the sharp edges, but the duct tape works well and is a much faster solution.
Look at the two hemmed edges of your topper. Each should have a thick, flexible cord inside to stop the fabric from slipping out of the tracks.
In some instances, the two cords will be of different sizes. Typically, the larger cord will be the side that attaches to the track nearest the RV, while the thinner cord slips into the roller tube track.
From the ladder at the end of the slide nearest the front of the motorhome, travel trailer, or fifth wheel, you’ll start inserting the topper material into the upper gutter track against the RV. One person can assist from the top of the roof or slide.
Once you slide the material in enough to line up with the edge of the slide, you’ll need to take the lower edge of the topper material and begin feeding that into the track in the roller tube.
After you start the topper into the upper and roller tracks, you can work slowly together to feed the material the rest of the way into position.
A good tip is to have the person on the ladder holding up the excess topper material to reduce the weight dragging backward while the person on top of the slide pulls the topper evenly down the upper and roller tracks.
Want to Connect With a Community of Over 1,078 RV Enthusiasts?
When you get toward the opposite side of the slideout, have the person on the RV roof come down and finish the task from the ladder.
Once the slide topper is in the correct position and centered between the roller tube ends, you can return any set screws to hold the material in place. Don’t forget to peel off any duct tape you use to protect the topper material from sharp edges.
Step 6. Allow the Roller Tube to Rotate to Take Up Excess Topper Fabric
Once you’re happy with the centering of the new topper fabric on the roller and over the slideout, you can now allow the tube to roll up.
To remove your locking pins (or Allen wrenches) from the roller tube, you’ll need to have two people firmly grab the tube and turn it a bit more toward the RV to release the pressure on the pins so they can slip out of the hole.
WARNING: Do not let the roller tube go. Remain gripping it firmly so you can control the speed at which it rolls back on the tension spring.
As the tube rolls up, it will pull the topper material taut. Once you reach this stage with the excess material unable to roll up any further, you can let go of the roller tube.
Check that the topper is even and without ripples or sagging. You can test the action by closing and opening the slide a couple of times before reinstalling the non-billowing brackets and screws that complete the job of replacing an RV slide topper.
RV Slide Topper FAQs
What’s the Best RV Slide Topper Material?
- Customizable to fit any slide out awning size (down to 48″)
- Replacement Fabric Only
- Thickness: 1/16″
- Material: Vinyl
The two main materials used for RV slide toppers and awnings are vinyl and acrylic.
Vinyl toppers are thicker and have a waterproof coating, so they are ideal for people who RV camp in wetter regions. However, the downfall of vinyl is that it’s more prone to deterioration from extreme cold or hot temperatures, which causes the material to crack or peel over time.
Vinyl is also not breathable, making it easier to accumulate mildew on both sides, so it needs washing more often than acrylic fabric toppers.
Acrylic fabrics are much more durable and breathable. In addition, the airflow through the material keeps the fabric drier to reduce bothersome mildew growth.
The biggest downfall to acrylic RV slideout toppers is that the material tends to drip from the underside if it gets wet since the weave is not 100 percent waterproof.
How Long Do RV Slide Toppers Last?

An RV slide topper with regular cleaning should last 5-10 years. However, many custom-made slide toppers use a high-quality material that can last 10-15 years on average with proper care.
Of course, the weather conditions where you camp play a major role in how long you can expect the material to last. Super dry climates can fade and weaken the material quickly, so it peels or cracks within a few years.
Heavy rain and wind destroy slideout toppers quickly if the material is too thin.
The best line of defense is buying the correct material type and thickness to best suit your camping needs and location of travel.
How Long Will It Take To Replace an RV Slide Topper?
A first-timer upgrading their slide topper can expect the procedure to take anywhere from 1 to 2 hours from start to finish. The more hands to help install the topper, the better.
The good news is that once you perform an RV slide topper replacement, you’ll find you can change the next ones much quicker. Many RVers say the second or third time replacing the topper only takes 30-40 minutes per slide.
How to Replace Slide-out Topper Fabric (Video)
Final Thoughts
Keeping RV slide toppers in good shape is one way to reduce damage to your RV from the elements. Unfortunately, while you can always hire an RV repair specialist to upgrade slideout toppers, not everyone can fit it into their RVing budget.
By using this guide to DIY RV slide topper replacement, you can ensure a fast and more affordable fix to torn or severely worn material that makes your recreational vehicle look bad and opens up the chance for annoying water leaks.
Mastering the skill of a DIY slide topper replacement will boost your RVing confidence and leave money in your wallet to spend on camping fun instead!


"Man cannot discover new oceans unless he has the courage to lose sight of the shore."
-- Andre Gide


")
